


A dead water sensor you don't trust is worse than no sensor at all. At least with no sensor, you're still checking tanks by eye. With a bad one, you're trusting a green dashboard while a trough runs dry on the back forty during a 98°F afternoon.
Most water-monitoring failures on farms aren't electronics failures. They're placement and maintenance failures. The hardware works fine on the bench. It's where you bolted it, how high off the water line, and whether anyone ever wiped the scale off the probe that decides if the data means anything three months later.
This is a field-level guide to getting water sensor placement farm setups right the first time: where sensors go, how high, what cleaning and calibration they actually need, and the false positives that quietly train you to ignore your own alerts.
The placement decisions that quietly ruin your data
The most common mistake isn't buying cheap sensors. It's putting a decent sensor in a spot that guarantees garbage readings.
A few patterns show up again and again:
-
Float switches mounted at the inlet. Water churns and splashes right where the line fills. A float sitting there bounces every time the valve opens, firing "level changed" events all day. People stop watching that tank's alerts within a week.
-
Pressure/level probes in the deepest sludge pocket. Sediment, algae, and mineral buildup settle at the lowest point. Put your probe there and you're measuring mud density as much as water level.
-
Temperature sensors in full sun on a black poly tank wall. You're reading tank-wall temperature, not water temperature. On a hot day that reads 15–20°F higher than the water the animals actually drink.
-
Sensors mounted where cattle can reach them. If a 1,400 lb steer can rub on it, it will. Mounting it there is just scheduling a repair.
Where sensors actually belong
| Sensor type | Good placement | Avoid |
|---|---|---|
| Float / level switch | Still section, mid-tank, away from inlet turbulence | Directly at fill valve or outlet |
| Pressure/submersible level | 2–4 inches off the tank floor, on the clean side | Bottom sludge pocket, inlet splash zone |
| Conductivity / TDS | Mid-column, in flowing or representative water | Dead corners where water stagnates |
| Water temperature | Shaded side, mid-depth, representing drinking water | Sun-facing wall, surface skim layer |
| Flow meter | Straight pipe run, 5–10 pipe diameters after any elbow | Immediately after a bend or valve |
That last flow-meter rule gets ignored constantly. People bolt the meter wherever the fitting lands, usually right after an elbow, and then wonder why flow readings swing 30% for no reason. Turbulent water off a bend reads wildly. Give it a straight run to settle.
Mounting heights: the small numbers that cause big problems
Height sounds trivial until a sensor spends a season either submerged in freeze or dangling above a drawn-down tank.
Simplify farm operations and enhance animal care.
Barnyly helps you organize, track, and manage every aspect of your farm operations seamlessly.
- Comprehensive livestock tracking
- Automated health alerts
- Feed and resource scheduling
No credit card required
For float switches, the number that matters is the gap between your "low" trigger height and the actual dry point. If the float trips at 6 inches but the pump line pulls from 2 inches, you've got a 4-inch buffer — which might be 20 minutes or two hours depending on herd size and flow. On a tank watering 60–80 head in summer, a float set too low gives you almost no warning before it's empty.
Set the low-level trigger high enough that the alert gives you real reaction time. A practical starting point: trigger the warning when the tank hits roughly one-third full, not one-tenth. You can always relax it later. Starting tight and loosening beats finding the dry tank first.
For submersible level probes, mounting height is about avoiding two failure zones:
-
Too low — buried in sediment, reading drift, constant fouling.
-
Too high — the probe comes out of the water during normal draw-down and reports "zero" when the tank is half full.
Two to four inches off a clean tank floor, verified against the lowest the water actually gets during a hot-day peak draw, is the safe band.
For anything electronic mounted on the outside — enclosures, transmitters, solar panels — keep it above the predicted splash and flood line and out of the manure-and-mud zone that builds up around heavily used troughs. That zone wicks moisture into connectors you thought were sealed.
Cleaning and calibration: the part everyone skips
The uncomfortable truth about cheap water sensors is that readings degrade slowly, so nobody notices. Scale builds on a conductivity probe over six weeks and the number drifts a little each day. You never see a jump. You just slowly start trusting a wrong number.
Conductivity / TDS probes are the highest-maintenance item. Mineral scale and biofilm coat the electrodes and shift readings. In hard-water regions this can be a two-week cycle. Wipe the electrodes, check against a known reference solution, and re-zero.
Level and pressure sensors mostly need the sensing port kept clear. Sediment or algae plugging a pressure port makes the reading stick — the number stops moving and looks stable, which is exactly why it fools people. A stuck-but-plausible reading is more dangerous than an obviously broken one.
Float switches are mechanical. They jam on debris, mineral crust, or a stuck pivot. A quick lift-and-drop test — physically move the float and confirm the alert fires — is the only real check. Staring at the dashboard tells you nothing about a stuck float.
A realistic cleaning cadence
Don't over-engineer this. A workable baseline for most farms:
-
Weekly (30 seconds per site) visual check, confirm sensor is in the water, no obvious scale or debris.
-
Every 2–4 weeks wipe conductivity electrodes, clear any pressure ports, lift-test floats.
-
Monthly or seasonally calibration check against reference for conductivity/TDS; verify level reading against a manual tape or stick measurement.
-
Start of summer and winter full inspection — connectors, seals, mounting hardware, cable chafe points.
Hard water, high algae, or heavy sediment pushes everything toward the shorter end of those ranges.
In hard-water regions, check conductivity probes on the shorter, two-week cadence rather than monthly.
Hard water, high algae, or heavy sediment pushes everything toward the shorter end of those ranges.
A maintenance log that people will actually use
The failure mode with maintenance logs isn't that they're wrong. It's that they're too detailed, so nobody fills them in, so you have no history when a sensor starts lying.
Keep it brutally short. Five fields:
-
Date
-
Sensor / tank ID
-
Action (cleaned, calibrated, float-tested, replaced)
-
Reading before vs. after (if calibrated)
-
Initials
That's it. The whole point of the log is to spot drift patterns — if Tank 4's conductivity probe needs a bigger correction every single calibration, that probe is failing and you order a replacement before it strands you.
> Tank 4 conductivity, calibration offset over three visits: +40, +95, +160 µS/cm. Each correction is bigger than the last. The probe isn't drifting randomly — it's degrading. Replace it now, not after it reads totally wrong during a heat event.
That trend is invisible without a log and obvious with one. This is also exactly the kind of data that gets collected and then ignored — the broader problem of letting readings pile up without acting on them is covered in common integration mistakes and simple workflow fixes. Clean data that nobody reviews is just a slower way of being surprised.
A simple visual of the maintenance workflow helps teams follow the five-field log.
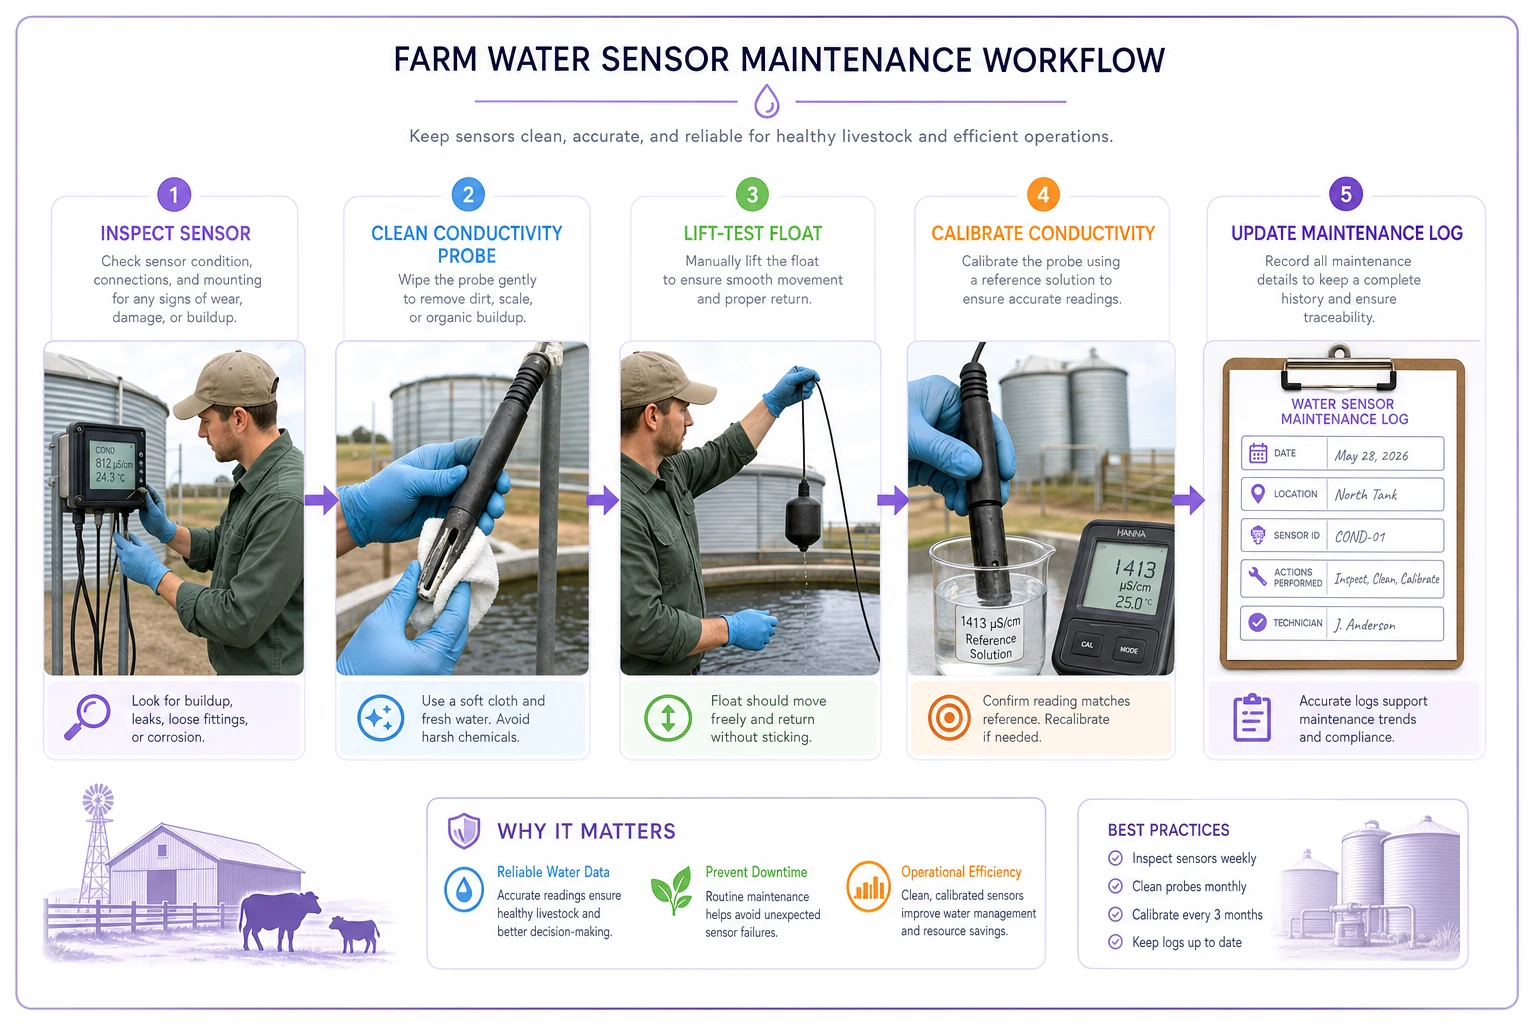
Keep the visual simple and pinned near the toolbox or truck clipboard so it's actually used.
The false positives that break trust in alerts
This is the real killer. Not sensors that fail — sensors that cry wolf. A handful of false positives and people mute the alerts. Then the one real dry-tank alert gets ignored with the rest.
Here are the false-positive scenarios that show up most, and how to defuse each one.
1. Float chatter at the fill valve
What happens: The float sits in turbulent water and bounces as the tank fills, firing dozens of level-change events.
Fix: Move the float to a still section away from the inlet, and add a short debounce — require the level to hold for 30–60 seconds before the system treats it as a real change. Most low-cost controllers support a simple delay like this.
2. The midday temperature spike false alarm
What happens: A sun-exposed temperature sensor reads a scary high number for a couple of hours, triggers a heat alert, then settles. Classic sensor-placement artifact, not an actual water problem.
Fix: Shade the sensor and mount it at drinking depth. If you still get brief spikes, require the high reading to persist — say, 15–20 minutes — before alerting, rather than firing on a single sample.
3. The "sensor out of water" zero reading
What happens: During a hot-afternoon peak draw, the water level drops below a too-high probe, which reports zero or "empty." The tank refills minutes later. You get a dry-tank panic alert for a tank that was never dry.
Fix: Correct the mounting height first. Then set the dry-tank alert to require the low condition to hold for several minutes, which filters out brief draw-down dips while still catching a real empty tank fast.
4. Conductivity swing from a fresh fill
What happens: Fresh water hits the tank and conductivity/TDS readings jump as the water mixes, triggering a water-quality alert that clears on its own once things settle.
Fix: Place the probe mid-column in representative water, not near the inlet, and ignore quality alerts during and shortly after a known fill event.
5. Connector moisture after rain
What happens: A connector in the splash/mud zone wicks moisture, readings go erratic for a day, then recover as it dries.
Fix: This is a mounting and sealing problem. Get connectors above the splash line, use proper seals or dielectric grease, and route cables so water drips away from — not into — the connection.
The pattern across all five: most false positives are placement or timing problems, not bad sensors. Fix where it's mounted and add a short confirmation delay before alerting, and the vast majority of nuisance alerts disappear. That's what keeps people trusting the system enough to react when it matters.
A real scenario
A cow-calf operation running about 90 pairs across four pasture tanks installed low-cost float and temperature sensors to stop the twice-daily truck runs to eyeball troughs.
The first month was rough. Two floats were mounted near fill valves and chattered constantly; one temp sensor baked in the sun and threw heat alerts almost every afternoon. Within two weeks nobody was looking at the alerts — the dashboard had become noise. One tank actually drew down low during a hot spell and the warning scrolled past unread with the rest of the junk.
The fix took an afternoon and cost nothing but labor: floats moved to still sections, triggers raised to about one-third-full, temp sensors shaded and dropped to drinking depth, and a 60-second confirmation delay added to level alerts. They started a five-field log on a clipboard in the truck.
After that, nuisance alerts dropped to near zero. The next real event — a stuck float valve that stopped a tank from refilling — fired a clean alert that someone actually acted on, with roughly two hours of margin before the tank would have gone dry. Truck runs dropped from twice daily to a quick weekly maintenance pass. The difference wasn't better hardware. It was placement, mounting height, and killing the false positives.
When this setup makes sense — and when it doesn't
This makes sense when you've got tanks spread far enough that physical checks eat real time, water access is critical (summer heat, high stocking density, remote paddocks), and you've got hard water or algae that makes manual checking unreliable anyway.
This is a bad idea when you've got one tank next to the barn you walk past six times a day. A sensor there adds maintenance without saving a single trip. Automation that replaces a glance you already take for free is just more stuff to break.
Who should hold off: anyone not willing to do the cleaning and calibration cadence. An unmaintained water sensor drifts into lying to you, and a sensor you've learned to distrust is worse than a clipboard. If nobody owns the maintenance log, don't deploy the sensors yet.
Water access ties directly into how hard your pasture is working — thin forage and heat drive consumption up, which draws tanks down faster and makes placement margins tighter. If you're planning rotation alongside water monitoring, the stocking-rate math in pasture rotation schedules pairs naturally with getting water data you can trust.
The takeaway
Reliable water data on a farm has almost nothing to do with how expensive the sensor is. Cheap hardware, mounted right, cleaned on a simple schedule, and tuned so it doesn't cry wolf, will outperform premium gear bolted into a splash zone and never touched again.
Get the placement right, set honest mounting heights with real reaction-time buffers, keep a five-field log so you can see drift before it strands you, and defuse the handful of false positives that otherwise train everyone to ignore the alerts. Do that, and the green dashboard actually means the tanks are full — which is the whole point.
Ready to optimize your farm management?
Join hundreds of farmers using Barnyly to save time, improve animal health, and increase farm productivity.